Data security has become a paramount concern in our digital age. Whether you’re a financial analyst handling sensitive financial information or a student organizing academic records, protecting your Excel files from prying eyes is essential. Fortunately, Microsoft Excel provides a robust built-in feature to password protect your files. In this article, we’ll explore the step-by-step process of securing your valuable data with a password for online excel sheet sharing, ensuring confidentiality and peace of mind.
Why Password Protect Excel Files?
Before we delve into the “how,” let’s first understand the “why” behind password protecting Excel files. When you store sensitive or confidential data in an Excel workbook, you want to ensure that only authorized individuals can access it. Password protection acts as a digital lock, preventing unauthorized users from opening or modifying your files.
By password protecting your Excel files, you safeguard financial records, personal information, business plans, and other critical data from accidental or intentional exposure. It’s an essential security measure that can prevent data breaches and potential legal consequences.
Step-by-Step Guide to Password Protect an Excel File
Now, let’s dive into the step-by-step guide on how to password protect an Excel file:
Step 1: Open Your Excel Workbook
Launch Microsoft Excel and open the workbook that you want to protect with a password. Ensure you have the necessary permissions to modify the file.
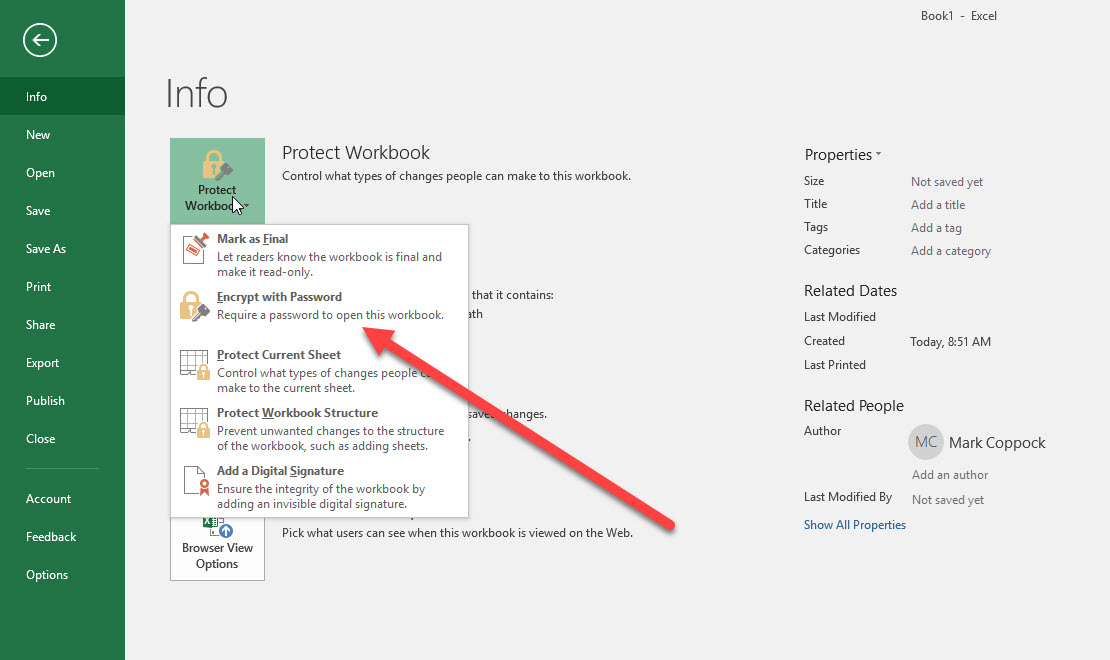
Step 2: Prepare to Encrypt
Click on the “File” tab in the top-left corner of the Excel window. From the dropdown menu, select “Protect Workbook” and then choose “Encrypt with Password.”
Step 3: Set Your Password
A dialog box will appear, prompting you to enter a password. Choose a strong password that combines uppercase and lowercase letters, numbers, and special characters for maximum security. Make sure it’s something you can remember, as forgetting the password may result in data loss.
Step 4: Confirm the Password
After entering the password, you’ll be asked to confirm it by retyping it in the second dialog box. This step ensures you didn’t make any typos during password entry.
Step 5: Save Your File
Once you’ve set and confirmed your password, click “OK” to apply the encryption. Save the file to activate the password protection. From now on, whenever someone tries to open the workbook, they’ll need to enter the password you’ve set.
Best Practices for Password Protection
While setting a password provides an additional layer of security, it’s essential to follow best practices to ensure your data remains well-protected:
- Use Strong Passwords
Always use strong, unique passwords for each Excel file you protect. Avoid common passwords or easily guessable phrases. A combination of letters, numbers, and special characters is your best defense.
- Avoid Sharing Passwords
Only share the password with individuals who genuinely need access to the data. The fewer people who know the password, the more secure your file remains.
- Regularly Update Passwords
Consider updating your passwords periodically. This practice helps prevent unauthorized access, especially if you suspect a security breach.
- Backup Your Files
In case you forget the password or encounter any issues, regularly back up your Excel files. Keeping a secure backup ensures you have access to your data even in challenging situations.
Additional Protection: Workbook-Level vs. Worksheet-Level
Excel offers two levels of protection: workbook-level and worksheet-level.
a. Workbook-Level Protection
When you password protect the entire workbook, it applies to all the sheets within it. This method is ideal if you want to protect the entire dataset consistently.
b. Worksheet-Level Protection
Alternatively, you can protect individual worksheets within a workbook. This approach allows you to grant different levels of access to various sheets, depending on their content and users’ roles.
Removing a Password from an Excel File
If you ever need to remove a password from an Excel file, you can do so by following these steps:
- Open the Excel file that you want to remove the password from.
- Click on the File tab.
- In the Info section, click on the Protect Workbook button.
- In the Protect Workbook dialog box, clear the Encrypt with Password option.
- Click on the OK button
Unlocking Password-Protected Files: Breaking In or Safekeeping?
While password protecting Excel files enhances security, it’s essential to understand that no password is entirely foolproof. There are tools and methods available online that claim to crack password-protected Excel files. However, attempting to bypass someone else’s password-protected file is illegal and unethical. It’s essential to respect others’ privacy and data security.
If you find yourself forgetting the password to your own file, don’t panic just yet. Excel doesn’t offer a built-in method to recover or reset a forgotten password. Therefore, it’s crucial to create a password you can remember or keep a secure record of your passwords.
Excel vs. Third-Party Solutions: Choosing the Right Path
Excel’s built-in password protection is a convenient and straightforward solution for most users. However, if you require more advanced security features or additional encryption options, you may consider third-party solutions. Several software tools offer enhanced file protection and additional encryption algorithms.
When opting for third-party software, it’s essential to research the reputation and reliability of the tool. Choose reputable solutions that have positive user reviews and a track record of data security.
Conclusion: Empowering Data Security with Excel
Password protecting an Excel file is a vital step in securing your valuable data from unauthorized access. By following the simple steps outlined in this article, you can add an extra layer of protection to your sensitive information. Remember to use strong passwords, avoid sharing them unnecessarily, and regularly update your security measures. Excel’s password protection feature empowers you to take control of your data security, ensuring your files remain safe and confidential in the digital landscape.